Wednesday, September 29, 2021

How to Build Massive Deltoids, Part Five- Larry Scott


"Dip down a little RIGHT at the top of the exercise so 
you don't have to use your traps."


I get so many good ideas when I talk to my clients, and this communication becomes a valuable source of information. Let me share just such a conversation with you. The other day I was speaking to Tony Cacciola, from New York, who is not only a client of mine but also a personal trainer.

Tony was telling me how much he was looking forward to attending out upcoming workshop in August.

"Larry, I am looking forward to seeing how you actually do some of the exercises. It will be a big help. I hate to say this, Larry, but frankly, I get more out of reading your articles than I do from the exercise description pack you sent to me." 

"No need to apologize, Tony," I said. "I understand completely. When I write an article, I am dealing with only one exercise, whereas I have to cover hundreds of exercises in the Exercise Description pack. Can you imagine how many pages it would take to explain each exercise in detail," I replied.

"Yeah, I guess so," he said. "I try to tell my clients how to do the exercises the way I think you are showing me, but, I have a hard time getting the exact movement. I want to get them right because I think you have some unique ideas about exercise form." 

"Thanks for the compliment, Tony, I learned some time ago that conventional movements were not going to get me the growth I needed to compete against guys that were "naturally" bigger. I simply couldn't make enough gains doing things the "plain old vanilla way." I had to find something better. In many cases I feel I have been successful. I know I can change a person's physique tremendously if I can just get them to learn some of these unique movements.

"For example, when we were fist beginning to build Lee Labrada's exercise program. Lee told me he didn't believe he needed special exercises to build a great physique. He felt all he needed was the basic exercises. 

"I was so happy to hear him say that. I knew we were going to have some fun. He was about to discover some secrets which his easy growth had hidden from him." 

"Yeah, I believe you Larry. I have learned to do shoulders the same way you explain in your Loaded Guns book. It does make a difference. I do have a question, though, about delts, if you don't mind," he asked. 

Sure, go ahead," I offered.

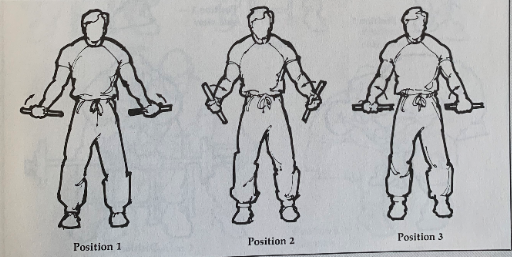
"I don't understand what you mean by starting out with one dumbbell higher than the other," Tony replied. [Side laterals.] 

"Tony," I said. "I tried so hard to explain the best way to work delts in that chapter. Unfortunately, even when I have the person right in front of me when I am explaining, it's hard to get it right. It's necessary to go over and over the same thing until the person finally understands.    

"Let's see if you can visualize it over the phone. The dumbbells are held in front of you with one hand higher than the other. I don't mean in front of each other but one actually on top of the other." 

"You mean the plates are hitting the knuckles of the other hand?" he asked. 

"No, not hitting the knuckles, but being clear on top of the other. One of the biceps is more flexed than the other and the upper body is bent over to help the dumbbells get started. Then, just at the top of the movement, you bob down with the upper body." 

"I don't bob at the top of the movement," he said.

"If you are not bobbing with the upper body at the top of the movement, you are almost assuredly doing the exercise incorrectly. One of two things is happening. You are either using too little weight or you are working your traps too much. You have to bob with the body at the top! This is what allows you to get the elbows into the top position without using the traps. This also allows you to use much heavier weight. Sometimes I will use 80 lb dumbbells on side lateral raises."

"Yeah, I have heard that and it makes me sick." Tony replied. "I'm having a hard time using 55's." 

"I know what you mean. Remember, I have been working on this movement for years. I could never do it with the correct form besides having worked really hard on my forearms." I answered. 

"Forearms?" he asked incredulously.

"Yes, Tony, the key to using big weights on side laterals is forearm strength. You see, you are not just swinging weights up into position like a rock at the end of a rope. You are sort of pressing them out to the side. This takes biceps and forearms as well as strong lateral deltoids. I know it seems strange but it's true.

"This is not a simple movement, there are several things one has to keep in mind while doing side lateral raises. Perhaps this is why it is so hard to get this exercise right. In order to work side delts you have to deactivate the frontal deltoids. They are going to try to do most of the work because they are stronger than the side lateral head. (frontal delts are worked during bench press, military press, dips, etc.) This is why there is a tendency to raise the thumb side of the dumbbell higher than the little finger side. This is a dead giveaway that the frontal delt head is working more than it should.

"Follow these steps and you should be able to get close to the correct form: Bend over at the waist, with the dumbbells held in front of you with one dumbbell held higher than the other. Dip the shoulders down a little and at the same time swing and press the dumbbells out to the sides. It helps if you have a very firm grip on the dumbbells with the little finger side of the hand pressed firmly against the inside of the plates. If the dumbbell handles are too long, however, off-setting the hands in this way makes the dumbbells cumbersome. The inside distance between the plates should be no more than 6" in order for this idea to work. You will need chalk on your hands because the grip needs to be very firm. I like to think of making finger prints in the handles. The grip is important because if the weight drops down to the fingers rather than being up tight in the palm, most of the effort is being expended by the traps, especially if you are not bobbing at the top of the movement. Another reason for the bobbing at the top is to properly complete the flexing of the side lateral head. This can be determined by looking at the mirror in front of you. You should just be able to see the rear delt flex right at the top of the exercise. You have to be able to see your form to know you are doing the exercise correctly. Again, you should be able to see the rear delt flex in the mirror. If you cannot see the rear delt flex, you are probably using too much weight and using the front deltoid. 

"You are NOT trying to hold the dumbbells at this top position at all. You are just bobbing down for an instant to get this full flex of the side and rear deltoid. The elbows and wrists are raised only as high as the shoulders. Any higher and you will be using traps or front deltoids." 

"I kind of know what you are saying, Larry, but it's a lot harder to do than it is to say." Tony replied.

"I know, it takes practice and it takes lots of forearm strength to be able to use a heavy weight. Once you get it though, it's the best possible exercise for building some really impressive deltoids. Again, be careful not to raise the shoulders. Raise only the arms. If you've built traps that are more powerful than your delts, it is going to be very hard to build impressive deltoids because the traps will always want to do the work for the delts.

"I hope you enjoy the secrets in this report . . . once again here are some . . . 
world of advice . . . 

Recipe for Success

1) Take a dream.
2) Mix it with motivation and action.
3) Add long hours of practice and discipline.

YIELD: Your goal, whatever it may be. 


Enjoy Your Lifting! 


Tuesday, September 28, 2021

HARDGAINER 2.0 is Now at Issue Six


Is your training working?
Are you really making good progress? 
If not, how about trying something different? 

HARDGAINER 2.0 is the all-new second run of Stuart McRobert's well-known and much-respected HARDGAINER magazine. It's published monthly and there are six issues to date. (Each issue has 60 pages). 
I have all of them, and they are TERRIFIC! The magazine is a big breath of clean air! 

If you're flipflopping from one failed routine to another, working hard in the gym but still seeing only minimal gains, if any gains, it's time to take a serious look at HG 2.0. The approach it promotes has worked wonders for countless bodybuilders and strength trainers. 

And it can do the same for you. 

One of the major threats to your training success is information overload. HG 2.0 provides a consistent, reliable, and trustworthy source of guidance and inspiration that will keep you on the training straight and narrow. 

It's packed with unique and exclusive articles. Each of its authors has decades of in-the-trenches experience of effective, drug-free training. 

The articles are written BY drug-free trainees FOR drug-free trainees.

The authors come from varied lifting disciplines, but the common thread is helping fellow trainees reach their goals, and doing it in a way that will add to the quality of their lives and relationships. 

Check the magazine out! 

Here is a link for more information: 


Enjoy Your Lifting! 
 

Monday, September 27, 2021

How to Build Massive Deltoids, Part Four - Larry Scott

 
Elbows and wrists forward on the starting position . . . 


The elbows go back, and you don't lock out on top. 


I want to share an exercise with you that has so much good in it that it becomes a wonderful exercise when done correctly even though the original piece of equipment is considered almost useless.

The piece of equipment to which I refer is the Universal Multi-Station. You know the ones I mean: The slowly rusting monstrosity standing in the middle of the weight room with several work stations on it. It has a lat pull on one end which isn't bad, a funny seated leg press next to it, then a bench press, some kind of a big pulley station and finally a seated press. The individual stations aren't bad it's just the whole concept of a "Jungle Gym" has given way to individual machines in the health clubs of today. 

Let's concentrate on the seated press for the purpose of this article. There are several things to recommend this exercise. Even though manufacturing these chrome giants has passed into antiquity. Paramount Exercise Equipment Company for example has selected a few of the exercises and improved upon them to such an extent that they are truly superior exercises. In fact, some of these single station machines can provide a benefit which free weights cannot. The seated shoulder press machine is one of these sleeping giants. It can be incredibly effective building immense shoulders if done in the right way.

Let me share a conversation I recently had with Russ Boyd the other day in my Health Club. It went something like this . . . 

"Larry, I have been trying to add size to my delts and I would like your advice. Your delts are so thick, how did you build size on them? My clavicle width is okay but I just don't seem to be able to get the kind of massiveness I want. Do you have any suggestions?"

Russ Boyd has one of the most impressive sets of shoulders anyone would want. Granted most of his size comes from the width of his bone structure, but even so it was ironic that Russ would ask Larry Scott, who does not have a wide bone structure, how to build his delts.

"Russ, are you kidding. You have great delts." 

"Yeah, they are wide, Larry, but you have thickness . . . not only that but you have about two inches of pure muscle on the outside of your delts. I notice my bone structure comes right out to the end of my deltoid. How did you build all that size right on the outside of the shoulder?" he asked. 

"Come here, Russ, I am going to show you something you are going to love," I promised, as I led him over to the Universal Machine and set him down at the seated press station. This movement is terrific for building delts, Russ. In some ways it is even better than dumbbells. Of course you will go stale on this a lot faster than dumbbells but until that happens you can really make some quick gains. Notice the revolving plastic handles? You will need the moveable handle in order to get the elbow rotation which is so necessary to fire the side delts.

"Oh, wait a minute, Russ, let's get another bench, that bench is too high. I want you to be sitting so your hips are at least as low as your knees, or even lower if possible."

"Why is that," Russ inquired.

"Because if your hips are higher than your knees you will be tempted to press a little with your legs rather than with your delts. Besides, it just feels better. Here, use this bench. Slide it a little closer so you are just barely touching the knees on the weight stack. This will place the bars perfectly over the delts exactly where they should be. Now try that. Doesn't that feel better than the higher bench?" 

"All right, grab the plastic grips with the thumbs on the same side of the bar as the fingers (false grip), palms facing forward. Now I want you to press the weight about 5 or 6 inches and no further. Any further will start to work the triceps but even worse you will begin to irritate the shoulder joint. If you just use the lower third of the press, it won't cause inflammation of the shoulder like full lockout presses do. Okay, go ahead and press the bar. No, not like that, Russ, you start the press with the elbows forward s far as they will go. Then, at the same time you press the bar upward you need to throw the elbows back as far as possible. Go ahead, try it again.

"No, that isn't it, Russ. Here, let me show you." 

I then seated myself at the machine and tightened up my weight belt another notch. (Paramount's single station machine has a back support so you don't need to worry about hurting your back). All right, here's what I mean," I said as I pressed the bar, at the same time rotating my elbows correctly through the exercise.

Oh, I see. Let me try it again," Russ urged.

"That's close, Russ, but you have got to throw those elbows back further on your way up. If you don't throw the elbows back on the way up, you won't be able to work the side delts. Most of the pressing movements for deltoids work only the frontal deltoid. It's only because the side delts are pulling the elbows back that we can build width in this exercise."

"Oh, I see," he said. "You actually throw the elbows forward at the bottom of the exercise to give you the momentum to throw them back at the top of the movement." 

"Yes, that's it Russ, now you got it! All right, now for the second benefit of using the machine. The deltoids love constant tension and they thrive on descending weights. A machine will allow you to change weights in just a couple of seconds, so multi-set work is a breeze. If you have a set of fixed dumbbells you can change dumbbells easily, but you have to use so much energy lifting the dumbbells up into position and setting them down again. With a weight stack you can use every bit of energy just building delts. Start with a weight you can just make about 6 reps with, the ideal number of reps for building size. Do 6 reps, drop the weight, and do another 6 reps, drop the weight and repeat this process until you have done 6 sets of 6 reps. Go ahead and try it."

I watched as Russ ground out his series of elbow rotating presses on the machine. 

"Wow, that is simply great, Larry. I can't believe the pump," he said as he checked out his pump in the mirror behind the press machine. "This is terrific, let me try that again." 

"Isn't it fantastic," I rhapsodized with him. Elated to see that he too was having the same fun with the exercise that I was. Leaving Russ with his new toy, I parted with: "Russ, there are a couple of things you need to remember. First, this exercise works best after the delts are a little tired, and second, the intense burn and pump will only last for about a week and then the movement will begin to lose its effectiveness. When this happens, go back to the dumbbells for a while to refresh the delts, then you can return to the machine again. You will be able to build some monster delts using this concept. Deltoids were always my weak point, Russ. So I had to always be on the lookout for special for special ways to pack on mass. This system is one of the best of which I am aware." 


Sunday, September 26, 2021

Turn Your Pulldown Bar Upside Down for Better Gains - Larry Scott

"Look at how Lou's lats flare out at the bottom just standing there relaxed. Sensational!"


It was way back in 1958, my first time out of Idaho, I had just arrived in California to pursue an engineering degree. I was in heaven. 

I had no more settled in to my apartment on Vine Street in Hollywood than I lit out for Bert Goodrich's club on Hollywood blvd. The place was packed with all kinds of big guys. I was so pumped I was dying to hit it. The guys could see I was a fanatic and having the time of my life. 

Someone said, "Wait till you see Lou."

"Lou who?" I asked.

"Lou Degni! You haven't seen anything yet.
 
A few days later he arrived . . . 

It was Lou Degni in the flesh. You had to see him to believe it. His whole package was incredible. His pecs were so thick you could bury your entire index finger before you hit rock bottom. His back and abs were sensational and . . . Good Looking! Besides a great face he had perfect teeth and curly white hair.

I hate to say it but . . . I almost worshiped him. 
He was everything I wanted to be.   


For some reason, Lou took me under his wing. I guess he was impressed with my determination. Anyway, he started teaching me things no one else was doing and even to this day, no one . . . I mean no one knows these things. 

Especially secrets for building lats. 

Yeah, there's some great backs around today but you gotta remember Lou was doing it clean. We didn't even know the word . . . steroids . . . then.

He showed me little ways to build lats so they came out like a heart at the bottom. Not just V shaped but heart shaped. It took your breath away to see those things. The shock value never left me. I never even came close to his back development but the things he showed me gave me a big edge.

Lou did a lot of unusual exercises. It was almost like he trained in a different world than the rest of us. There were some big guys there too. Gordon Scott who was playing Tarzan at the time trained there, but his program was a lot like ours. But not Lou's. You couldn't even figure out how to copy him . . . he did things so differently.

I guess a lot of it had to do with the strange equipment he rigged up. I can't tell you everything in this report but I'm going to tell you about his pull down bar. It was UPSIDE DOWN. It had chewed up cloth tape all over to keep his hands from slipping. It didn't look great but . . . who cared when you saw what it did for Lou's back.

A few of us fanatics . . . hung around after a workout . . . hoping we could just get a sneak shot of his back. It was awesome. The nearest I can describe it was . . . a big heart built out of muscle. Especially his lower lats, which almost hung down. It gave you a little funny feeling down around your tailbone to see 'em.

Like I said before I know all the Olympia winners and I haven't talked to anyone that knows what I'm about to tell you.


Not as good as Lou but notice how the lower lat comes all the way down. 
It's from the tips in this article.  


How to Build Incredible Lower Lats

It all focuses on scapula retraction. Lou would tell me, "Larry, you've got good arms but they're going to kill your back if you don't do something about it. You've got to get your arms out of the picture if you're going to build your back. Let me show you." 

Then he hooked his upside down bar to the lat machine, chalked his hands and cranked out the most incredible looking pulldowns you have ever seen in your entire life. We couldn't keep from chuckling. His back was beyond inspiration. All you could do was shake your head, chuckle and be glad you got to see it. I can't tell you everything he showed me but I will tell you . . . 


How to Build an Upside Down Bar

The bar has to be thicker than normal bars, so you can get your palm to stick to it rather than pull with your fingers. The secret to lat isolation is getting the palms high on the bar. The one inch bars with the rotating sleeves are all wrong. You definitely don't want the bar to rotate. Furthermore, turning the bar down on the ends is all wrong as well.

The bar should TURN UP about 10 degrees where most bars turn down and . . . it should be at least 1.5 to 1.75 inches thick with no rotating sleeve. 

In fact, a plain old straight bar that's a little thicker is a lot better than the ones that turn down at the end.

You see, in order to get the scapula to go through their full rotation you have to get the little finger side of the hand higher than the thumb side Otherwise the scapula doesn't start in the fully abducted position. Furthermore, you end up working mostly biceps once your grip slips from palms to fingers. That's why you need the thicker bar and lots of chalk.

You can use exactly the same bar for a pullup bar. Just get a couple of hooks welded on to it. Then you just throw it over your normal chin bar.

Once you've got your bar in place then you're ready to build some incredible lats. Here's all you have to do.

First grab the bar out where it turns up on the ends, then, let your body hang down completely. Don't start to raise your body yet, first adduct the scapula. For those of you, like myself, who have a hard time remembering, just remember abduct means to take away. So abduction means to move the scapula away from the trunk. Conversely, adduction means to bring the scapula in close to the body. First adduct the scapula. That's right, bring them in as close to the body as you can. In other words, make yourself as narrow as possible before you even start lifting your body up to the bar. Now with the elbows held all the way back, arch the upper body and slowly lift yourself up to the bar. Try to touch your chest to the bar if you can. If you can't touch the bar, don't worry about it, just keep the body in an arched position with the scapula held in as tight as possible. Keep the elbows back. Now, right at the top. throw the scapula and the elbows forward.

Remember, if you don't keep your elbows back, you won't be able to throw them forward at the top. This is the crucial stage of the exercise. Throwing the elbows forward and the subsequent abduction of the scapula puts the back through its entire range of motion, which in turn causes the lower lats to develop so well. 

This is how a pulldown or chinning bar should look.
The ends turned up and padded. 

Be sure you don't lean too far back at the top of the movement or you won't be able to fully throw your scapula forward.

If you're having trouble, maybe this will help. Forget all about the scapula. Just think in terms of your lats. Right at the top of the movement, spread your lats as wide as possible. Then, still holding the lats our wide, slowly lower yourself back down into starting position again. 

If you get this movement down pat, it will more than triple your results from pullups. You must learn to rotate the scapula through their entire movement. You see, the weight of the body is holding the scapula in a "neutral" position. The lats must be forced through this entire isolation maneuver in order to make them grow.

Most of the time when we do pullups we are working biceps and some incidental lat work. When we concentrate all our energy on the scapula while doing pullups we are forcing the lats to do most of the work.

I would urge you to practice this rotating scapula movement in your training. You will feel the difference right away in the pump you get. The turned up bars make it a lot easier. They're terrific. 

Enjoy Your Lifting! 


Power Forearms, Part Two - Health for Life (1984)


Part One is Here: 


A REVIEW 

At this point, we have the information necessary to begin structuring an effective forearm program. Let's review before getting down to the specifics of exercises. 

1) We will be working to increase strength, mass, and definition of the major muscle groups in your forearms, wrist flexors/extensors, forearm supinators/pronators, finger flexors/extensors, plus the brachioradialis. Remember, developing balanced strength around the wrist joint greatly reduces your chances of wrist injury during other athletic pursuits.

2) Our program will incorporate the Fatigue/Tension principle. This means: 

 - Short rests between exercises for the same muscle group, or no rest between exercises for different muscle groups.

 - Use of relatively light weights. General guideline - in a 6 to 8 rep set, the last 2 reps should be nearly impossible. We is woikin' hard at this game. 

 - Adjusting exercises to match resistance to muscle leverage.  

3) We will let the Interdependency of Muscle Groups dictate exercise order. The result: 

 - wrist extensor exercises will precede brachioradialis exercises.
 - finger flexor exercises will come last.

4) We will only use exercises that put minimal stress on the elbow and wrist joints. 


PROGRAM SECTION

Now, down to specifics. You may already be familiar with some of the following  exercises, but keep two things in mind: 

1) The description contains certain fine points of form you are probably familiar with. These fine points can elevate an exercise from "workable" to "incredible!" Give them a chance.

2) Remember synergism: We optimize on all levels. First, applying the laws of biomechanics we make each exercise as effective as possible. Then, we work to discover the optimum order. In the final analysis, it's not so much the exercises themselves as their sequence and timing that makes Power Forearms! such an effective conditioning tool.


The Exercises


Wrist Twists with Pipes

directly: pronators/supinators
indirectly: extensors/flexors

This exercise warms up your forearms and wrists. Needed: two dumbbell bars (dumbbells with no plates on either end), or small heavy pipes 12-15" long.

Grasp the DB bars in the center, one in each hand. Extend your arms out to your sides. Your hands should be about 18" from your body. Gripping the bars AS TIGHTLY AS POSSIBLE, twist bars back and forth at a rate of about 1 back/forth twist per second. Continue for 45 seconds to a minute.

Next, bend arms at elbows so forearms are parallel to the ground, and, once again, twist bars for 45 seconds to a minute. 


Wrist Curls

wrist flexors with forearms supinated

Grip a barbell, palms up, with your hands about six inches apart. Straddle an exercise bench, and let about half of  your forearms extend over the end. Brace your arms against the inside of your knees. Let your wrists bend back and slightly open your fingers, then curl the weight up as far as you can go. Repeat. 

Let the elbows rise up off the bench at the bottom of the motion. Doing so will more closely match the resistance of the exercise to the firearm, er, forearm flexors. Result: you will be able to use more weight - and massive forearms only come from a hefty overload! 

You can increase the effectiveness of the exercise by gripping the bar tightly throughout the motion. But DO NOT open your hands or roll the bar to the tips of your fingers, as this may burn out the finger flexors and limit the effectiveness of your workout. 

Note: Check out the hips higher than elbows position. Also, if you're familiar with the one DB version Dave Draper and Chuck Sipes used, and I'm sure many others did prior to them, note the position of the elbows in relation to the shoulders; the narrowness of the grip, the angle of the forearms to upper arms while curling. 


Reverse Wrist Curls

directly: wrist extensors
indirectly: brachioradialis

Take a slightly wider than shoulder width grip on a barbell, palms down, and place your forearms on your knees as you sit on an exercise bench. Your wrists should be just beyond your knees; your forearms should be at a slight diagonal so your elbows are just outside or your thighs. In the starting position, your elbows should be up off your lets, your wrists bend down (see Position One, side view). 

We cannot stress enough the importance of keeping an extremely tight grip on the bar. We are not talking about your standard clench. Hang on to that bar as if you were trying to squeeze it into dust! 


Behind the Back Wrist Curls
a.k.a. Bloatlord Bend Over and Bend Bar Wrist Curls


wrist flexors with forearms pronated

Put a barbell on a bench two or three inches from the end of the bench. Straddle the bench, palms facing back. Bend forward and down, and pick up the bar with hands shoulder width apart.

Partially straighten up. This should leave you with your forearms against the outsides of your thighs and the bar hanging in space behind you. Narrow your grip slightly by sliding your hands toward one another.

Gripping the bar tightly (TIGHTLY!), curl it up as far as you can. Hold for one second, then lower the bar. Repeat.

Note:  

- If you don't really feel a burn, or if the position is uncomfortable, try using a still narrower grip.

 - It's okay to use A BIT of body motion to help you lift the weight.


Reverse Curls

brachioradialis

Stand with your knees slightly bent, holding a barbell with hands palms-down, about shoulder width apart. Without heaving your shoulders, whipping your arms, or snapping the muscles taught lift the weight until it touches your upper chest. Your elbows should come slightly forward as you lift, but they should NOT move out sideways! Then lower the bar. Repeat. (Remember to think your forearms into working -- concentrate, feel the muscle contracting. 


The next three exercises make use of the Single Ended Dumbbell (S.E.D.). Make one by taking the weights off one end of a regular dumbbell.


S.E.D. Wrist Abduction

wrist abductors

Stand erect, holding the dumbbell as close to the unweighted end as possible. The weight should be in front of you. Keeping your grip tight, lower the bar until it is pointing downwards. Your elbow, thumb, and the weights on the dumbbell should fall in a straight line. Bending only at the wrist, curl the bar up as high as it will go. Lower. Repeat for the desired number of sets and reps.


S.E.D. Wrist Adduction

wrist adductors

Same setup as above, but the weight should be behind you. Keeping your grip tight, lower the bar until it is pointing downwards. Your elbow, thumb, and the weights on the dumbbell should still fall in a straight line. Bending only at the wrist, curl the bar up as high as it will go. Lower. Repeat for the desired number of sets and reps. 


S.E.D. Wrist Twists

forearm pronators/supinators

Same setup as above, but seated. Brace your forearm on a workout bench (not your knee, that position is too unstable). Keep your wrist locked so the bar forms a 90 degree angle to your arm. Rotate your forearm, lowering the weight TO THE SIDE as far as it will go -- first to the inside (to the left if your holding the S.E.D. in your right hand) and then to the outside. Repeat. 

You should feel an intense stretch along the edge of the bone on the thumb side of your forearm. Be careful to control the weight throughout the motion. Letting it flop from one side to the other can result in strained wrist tendons. 


Grip Work

finger flexors

Assume the same position you used for Wrist Curls. Instead of keeping a tight grip and curling at the wrists, loosen your grip, allow the bar to roll to the tips of your fingers, and then curl it back up at the fingers. See Wrist Curl illustration for starting position.


Finger Extension

finger extensors

Cup your left hand over the back of your right hand, with both palms pointing toward you. You should have contact along the entire length of your fingers. Providing MODERATE RESISTANCE with the palm of your left hand, completely straighten the fingers of your right hand. (This is not an isometric exercise). Repeat for the desired number of reps. Switch hands and follow the same procedure. 


Part Three Continues from Here . . . 

Enjoy Your Lifting! 


Blog Archive