
First Issue, First Run
Latest Issue, 2.0 Run
Here is a related article on using the Rader Chest Pull for another purpose:
http://ditillo2.blogspot.com/2009/11/use-rader-pull-to-overcome-oxygen-debt.html
The main article . . .
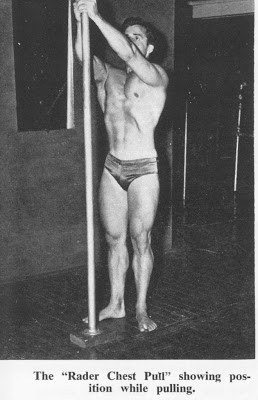
Developed by Peary Rader, the Rader chest pull is a stretching and forced breathing exercise that may enlarge our rib cage, deepen your chest, and help to improve your posture.
It may be especially effective for teenagers, and trainees in their early twenties, but is worth a try at any age. There's no science to confirm this, however. I do believe the breathing pullover and the Rader chest pull helped me, and other people have reported benefits too.
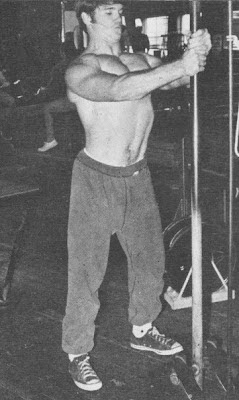
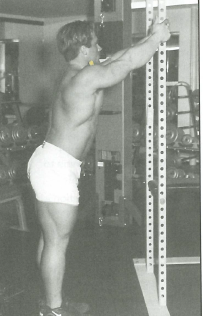
Stand at about arm's length from a vertical bar, with your feet hip-width apart. Alternatively, use a sturdy, stable object that can be grasped at about head height. An upright on a power rack, or a door jamb, will do the job. If you use an upright of a power rack, or a vertical bar, keep your hands together. If you use another object, keep your hands close together.
While keeping your arms straight, take a deep breath and simultaneously pull down and in with your arms.
Don't contract your abdominal muscles.
Keep them relaxed.
If you tense your abs, this will flatten your chest and defeat the purpose of the exercise. Done correctly, the Rader chest pull will raise your chest and produce a pull and slight discomfort in your sternum. If you don't feel this, you're not doing the exercise properly.
You may get a better effect if you bend your arms slightly, because this will let you pull harder. The harder you pull, the better the effect on your rib cage, so long as you're pulling in the right way.
Rader recommended that you tense the muscles at the front of your neck and then pull your head back. This should be done at the same time as you pull down and in with your arms. This neck involvement provides further stretching and lifting of your rib cage. But don't apply this tip until after you've learned to apply the other instruction.
Once you get to grips with it you'll feel a pronounced stretch in your rib cage. It may take a while to get the exercise right. You may have to fine tune the height you have your hands, the spacing between your hands, the distance between your feet and the base of the object you hold, and the angle of the pull. Persist until you get it right.
Hold your breath for as long as comfortable, and throughout the entire time you should be able to feel the pull and slight discomfort in your sternum. Don't, however, hold your breath until you're almost ready to burst, because you need to be able to perform up to 20 reps for a single set. How long you can comfortably hold your breath will depend on the state of your breathing prior to performing the chest pull, and your general conditioning. With practice, over time, you'll be able to hold each pull for a longer time, for a comparable level of discomfort. Somewhere in the range of 4-6 seconds per pull will be fine.
The Rader chest pull is traditionally done immediately after an exercise that gets you winded, such as the squat, especially when the latter's done for high reps. And it can be done at other times, too. It's not systemically demanding work, and neither is the breathing pullover.
Go easy at the beginning. The forded and exaggerated breathing may make you feel dizzy unless you work into it progressively over a few weeks. Your chest may get sore, too, if you don't work into the exercise gradually.
Enjoy Your Lifting!
No comments:
Post a Comment