
Building major body power with squats requires that you are mentally and physically committed to working hard, and keeping your focus. Serious power training is not simply breezing through a few sets of an exercise. It involves mastering intense mental focus, training your body to give maximum output for a few seconds, routinely doing a wide range of small movements correctly every time, and discovering how to enjoy this process.
By now you have probably figured out that if someone can write well page after page on how to do one exercise movement there must be a lot of small details that need attention. That is true.
What is not immediately obvious to some is that the fact that you are fit and strong enough to take on this challenge is a true blessing. Few people are actually able enough to do the workouts described below, and if you are one of the fortunate ones, you should feel grateful.
In that spirit, I'll describe a series of exercise programs that will help you build massive body power using the squat as a critical tool.
Many people try to become strong, but few actually realize even half of their potential. Generally, this is because those who fall short don't utilize their mind as well as their body in the quest for super strength. In the workouts that follow, yu will have to actually LEARN AND APPLY some things that may be new to you. If you devote the energy, focus and effort needed, you will be rewarded with strength far beyond what you believed possible.
The thing that will distinguish the super achiever from the person who just gets average results will be how diligently they are willing to practice all the small things that go into creating a big lift. The key to success is in mastering the details.
Warming Up for Squatting
Note: Once you have a bit of a sweat going from doing the usuals, the main thing to remember is: Don't expend any more energy than necessary on your squat warmup sets. Fill five pages with that and you'll have what I'm reading here.
CYCLE ONE: THE FOUNDATION PROGRAM
(a.k.a. 5 x 5 program)
The 5 x 5 approach is one of the most widely used in weight training for strength. If you are new to squatting or have not been squatting for a considerable while, this is a great program that will get you into condition to move some serious iron. If you've been powerlifting for many years, you will revisit this program frequently throughout your lifting life.
This program is 5 sets of 5 reps, all done at a percentagle of your best One-Rep-Max squat at the beginning of the program. If you have done a recent one rep max lift, you can use that. If you have not squatted heavy for a while [find out how to] estimate your one rep max lift.
As a general rule, it is much better to begin with a low estimate. You will make progrress rapidly as the weeks go by. If you start too high, you will plateau quickly.
You should do this workoout once a week, for eight weeks. At the end of eight weeks you will begin a new training routine. If 5 sets is too many for you to do and recover, eliminate the last set.
You will be doing 5 sets of 5 reps each. You should make a point of doing every set and every rep with perfect form.
Set 1 = 50% of One Rep Max
Set 2 = 70%
Set 3 = 80%
Set 4 = 70%
Set 5 = 60%
Depending on how difficult the set is, take anywhere from 2 to 5 minutes to recover between sets. Since you are building strength you will need to be well recovered before you begin the next set.
If you did every squat to proper depth, you will have really done what you need to build great strength.
Increase the weight EACH WEEK, not every workout.
If you start with the appropriate one rep max, you should be able to add about 5 pounds to the 80% set each week. Over 8 weeks that will be an increase of 40 pounds over your original weight [calculating your weights and increases "backwards" is useful]. You should also be able to add 5 pounds to your 70% sets.
If you can't continually add weight each week for the 8 weeks, it is okay to stay at a weight for a couple of weeks. What you don't want to do is start with too heavy a weight and not be able to make increases regularly. Starting too close to your limit will mean your progress quickly stalls, and may eventually go in reverse.
When you have finished your squats, you go to your assistance exercises. These are designed to build muscle that will support development of a big leagure squat, your goal here.
Most of your energy will go into the 5 x 5 squat sets. The assistance work in this program will be done to help build up the muscles that support the squat.
Assistance Exercises
Kettlebell Swing: This exercise is one that when done correctly will really build up your posterior chain. If you don't have kettlebells handy, you can use a dumbbell and grip one end.
In the swing I recommend here, the weight will never travel higher than a position where your arms are parallel to the floor. You should feel the exercise in your abdominals, glutes and hamstrings. If you feel it mainly in your lower back your posture is "rolled over" and you are not doing the movement correctly.
Begin by using a moderately heavy bell and start by doing 2 sets of 10-15 reps. You should work up to doing 2 sets of 25 with the same moderately heavy weight.
This movement will build great power in your core area.
Back Hyperextension: Building the strength of your hamstrings and glutes is critical to building a powerful athletic body. The hyperextension does a great job of building both strength and muscular endurance.
If you have not done this exercise before, begin without holding any extra weights. You need to get your hamstrings and glutes used to working through the full range of motion in this lift before stressing them to the max. Begin by doing 2 x 10 without any extra weight. Work up to doing 2 x 25 without weight before you start holding plates on your chest.
It is important that you do the hyperextension through the full range of motion. You need to lower your trunk so that at the bottom of the movement, you are at a 90-degree angle with the floor. At the top, raise your trunk so that your trunk is slightly above parallel position to the floor.
Hanging Leg Raise: You should begin by hanging from a chinning bar with your legs straight down. You should not hang limply from the bar, but should have a tight grip, and pull your body slightly up with your lats and shoulders. To recruit lots of power to this movement, your upper body needs to have tension throughout the lift.
There are two basic versions of this exercise. Depending on your current conditioning, you may be able to do the exercise with your legs straight. Most people will need to begin with the version where you raise your knees up with bent legs rather than raise straight legs.
You will be raising the knees to a position where the tops of your thighs have gone above parallel with the floor. Begin by doing 2 x 10, adding reps until you can do 2 x 20. At that point, switch to the version of the exercise where you raise straight legs to a position that is above parallel to the floor. Rather than do a set number of sets/reps, begin by doing as many as you need to get 10 total reps. Work up until you can do 20 total reps.
That's plenty of work for one squat session.
It is important NOT TO OVER WORK during this training routine. You should leave the gym feeling like you could "do some more.' If you fall victim to the temptation to train to near exhaustion each session, you will quickly stop making progress. Your body will not be able to recover andd build strength between training sessions.
If you want to build strength, training to failure is a clear pathway to failure.
Training to failure basically ensures that you never learn how to put out maximum force.
Keep a written record of every set, rep and weight for the entire eight week cycle. That way you can track your progress, and come back and see what worked best for you.
At the end of the eight week cycle, try for a new current One Rep Max squat. On the first workout day of the week after you have finished the eight week cycle, warm up properly and see what you can do now for a one rep max.
CYCLE TWO: PARTIAL SQUATS AND DEEP PAUSE SQUATS
In the second squat program I'll introduce you to using static contraction training along with "speed" squats. This is a program you will stay on for four weeks before changing to another.
Static contraction involves doing partial repetitions with weights that are much heavier than you could use doing a full squat. You are training your muscles to handle a much heavier load than you would use for a personal record attempt. The benefit of this is that when you do a heavy single rep, it will feel lighter on your back than it would otherwise.
You are also going to train your muscles to put out full power with some "speed work."
It is critical that you maintian proper squat form for all of the movements in this training program. There is always a temptation to alter your form when doing partial movements, or movements with light weights. You should be very careful to ensure that when you do the two lifts below you ensure that your body position is in the exact alignment that it would be when you were doing a full squat. You are using the partial squat to improve your regular squat, not to facilitate a bigger partial squat. Read that line starting "You should be very . . ." one more time.
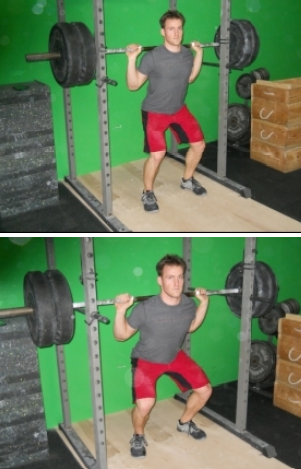
Partial Squats: There are many ways to use a power rack to train. This exercise should be done inside the rack with safety catchers. The catchers should be set at a height that will allow you to set the weight down if you can't complete the movement. The rack is one of the greatest training tools you can ever use to build great strength and power.
You will do partial squats with the catchers set a 2 different heights. In the exercise, you will take the loaded barbell off the rack and squat down until the bar on your back taps the catchers.
For the first set of partial squats, set the safety bar so that you will be doing about a one quarter squat. This will enable you to use some weights that are very heavy for you. See the pictures below for the approximate depth of a quarter squat.
Take the bar off the rack exactly as if you were going to do a regular squat. Walk back to the starting position in the rack. Remember to do this with a minimum of steps and movement [i.e., don't tiptoe around with one feet endlessly and perform a whole array of stupid looking adjustments. Set it and get to it. If you really can't seem to get set quickly, work on it.] When you are set up and ready, begin your descent exactly as if you were going to do a regular squat. Do not vary the body placement to enable a larger partial squat. Again, you're attempting to improve your regular squat, so do everything possible to maintain the same form as your regular squat.
You will descend only until the bar taps the safety bars. [Don't slam into the catchers unless you're a total bafoon. Shout loudly with each rep. Get shitty looking tattoos and act tough even though you're not. Did I mention train at home to avoid this army of bloated assholes patting one another proudly on the back endlessly?]
Once you have tapped the catchers stand erect and do one more repetition.
Keep the weight under control at all times. Just because you have a power rack around you is no reason to get sloppy.
You will do 4 sets of 2 reps with the safety catchers set at the quarter squat position. You will begin with a weight that is slightly above your one rep max regular squat, and increase the weight by 3-5% of your one rep max on each set.
DO NOT do more than 2 reps in each set. You are training your body to put out maximum force and control a very heavy weight.
When you have reracked the bar, you should lower the bottom catchers by one hole. You willthen do 2 sets of 2 reps at this height.
When you lower the catchers you will not be able to use as much weight as you did on the first set. Find your starting weight by taking about 60% of your one-rep max and seeing if you can descend and touch the safety bars with proper form. From there, you will find weights that you can do for 2 sets of 2 reps.
One of the strongest men of all times, the late Paul Anderson, used this type of training to build his squat to phenomenal levels. One of his approaches was to start with a partial squat, and over time increase the range of motion until he was doing a full squat with that weight. This is an extremely effective training technique, but requires a lot of effort over several months.
Partial rack squats will put a significant load on your central nervous system. if you have not done heavy training much before, you will find that the few repetitions you perform in the rack will really tax you. It will take some time to build up your capacity to do a lot of work with really heavy weights.
Deep Pause Squats: The second movement in this cycle is designed to promote explosiveness. The is the "Deep Pause" squat. In this exercise you will take a weight that is light for you (begin at 50% of your one-rep max), and descend to the lowest position you can. At that point, literally "pull" yourself deeper into the squat using your hip flexor muscles.
Keep your body tension, and remain in perfect squatting position. When you are in the deepest position you can reach, hold yourself there for count of 5, then accelerate upward to a standing position AS FAST AS YOU CAN.
You will be doing 4 sets of 2 reps.
The two keys to success in this movement are:
1) pausing for a count of 5 in the deep position; and
2) accerating out of the bottom of the squat as fast as you can.
KEEP PROPER FORM THROUGHOUT THIS MOVEMENT!
There will be a strong temptation to accelerate out of the bottom by raising your hip first. You need to DRIVE out of the bottom with your chest coming up first to get the benefit of this movement.
Assistance Exercises

Good Morning: This movement will really strengthen your posterior chain . . . better known as the glutes, hamstrings and lower back. It can look like a squat gone terribly wrong, but in reality it is a great power builder.
You begin by taking a light weight off the squat rack with the bar in the same position you would use for a regular squat. Step back and set your feet wider than shoulder width. At that point, you bend forward at the waist until your torso is just above parallel position with the floor. Keep your back flat and flexed with a slight arch in your lower back. To keep your balaice, bend your knees slightly. When you are bent forward to the place where your torso is just above parallel, return to the starting position.
I emphasize starting with a light weight, since this movement can really surprise you if you have not done it before. It will put a huge stress on the hamstrings, and most people are not ready for doing hard work with their hamstrings through a full range of motion.
You need to ensure that you are doing the good morning exercise through a full range of motion. Be certain that you bend oveer at the waist, and lower your chest until your trunk is slightly above parallel to the floor. This means that you have bent over almost 90 degrees from the waist. I emphasize this because so many people "cheat" on exercises by cutting the depth or range of motion. If you want to get strong, never cheat by cutting depth or doing the easy range of motion. Always do a movement through the full range of motion, including including partials through a full "partial" range. Note: Just don't bloody get soft and lazy in the head with these. Focus . . . Put Out!
To ensure that you do the good morning movement correctly, begin with a light weight. Even if you begin with a really light weight, if you consistently practice the movement correctly, you will be amazed at how strong you can become. This is one of those "big kid" exercises that build real strength and power. You need to do it correctly to get results.
To reinforce my point, the good morning has become a standard movement for building back, hip and posterior leg strength in NFL weight training facilities. Competitive powerlifters have used it for decades with great results. But, you almost never see it done in "regular" gyms.
When you first do the good morning exercise, first work on mastering the movement, then begin adding weight. Start with 2-3 sets of 8-10 reps. As you get more capable with the movement, you increase the weight, and keep the reps at 10. When you get stronger, and no longer have issues with balance or the depth of this movement, go for heavier weights, more sets, and fewer reps.
CYCLE THREE: BAND TRAINING
One of the greatest assets to building a big squat are bands. In this program, I'll show you two of the best training band exercises that will add a huge amount to your squat power.
Bands come in a variety of sizes. In this program you will begin using bands that are intermediate in strength. When you have gained experience with using the bands, you can be more aggressive and use heavier bands.
In this program you will be doing regular squats, but with the bands working on the loaded bar as well. You will do all of these movements in a rack in order to string the bands correctly, and for your own safety.
Upper (Reverse) Band Squat: Begin by attaching the bands to the upper bracket of the squat cage at approximately the position where you will set up to do the squat. Attach the bands to gthe bar between the first barbell plate and the inside collar.
When you take the bar off the rack, the bands will be slack and provide no real change in the way the weight feels. However, as you descend, the bands will get tight and begin to take some of the weight off the bar. What this means is that you will be able to handle a much heavier weight in a deep squat position.
As the weeks go by and you practice this routine, you will be able to handle a very large weight at the top of the lift because it gets "lighter" as you descend. In the early going, it is best if you experment and discover what weights you can manage. You will find that you can add weight rapidly to this exercise once you are used to how the weight "unloads" as you descend.
To do the exercise, begin with a weight that you can do 3-5 unassited reps with. Attach the bands to the weight and the squat cage. Take the bar off the rack as if you were going to do a regular squat, take a deep breath and hold it, then descend as you normally would.
As you descend you will find that the weight becomes "lighter" as the bands stretch. How much lighter will depend on the strength of the bands you use and how much tension is placed on them. Each set of bands seems to be different, so assume that any estimate you make about the amount of weight lifted by the bands will be approximate.
Do 3 sets of 3 reps and 1 set of 2 reps, increasing the weight on the bar each time.
Lower, Bands Pull Down: In this exercise you will reverse the position of the bands, so that they pull the weight down. This exercise activates all of the muscles that work to keep you stable when doing a squat. This allows you to control more weight with the bar on your back.
The first thing you do is attach the elastic bands to either a safety bar at the bottom of the rack, or to a heavy dumbbell. The main purpose of this exercise is to help you get better control of the weight on your back. When you take the weight off the rack it will suddenly feel like it wants to go in every different direction. The elastic band will be fighting you for control of the bar, a fight to the death over a knife stuck in the mud, no, wait. For this reason, BEGIN WITH A VERY LIGHT WEIGHT.
Don't be fooled by using a light weight, light weight, baby. The elastic will always fight you for control. This will build your stability and support muscle structure. That is very critical when you handle big weights. It will also build a lot of explosive power in the top third of the squat. You will notice this when you lock out a heavy weight.
As you get more skilled at controlling the weight, you can put more weight on the bar. However, the weight you use in this exercise should never go above 40-50% of your one rep maximum.
Do 6 sets of 2 reps. This will tax your support muscles in ways you may not be used to. When you get fatigued, accidents can happen. Never be sloppy or casual about performing this movement.
Dumbbell Band Squat: This exercise is designed to activate your support muscle system through the entire range of the squat. Quite simply, this exercise is a regular squat with dumbbells or kettlebell hanging from elastic bands on the end of the squat bar.
Load the squat bar with a light weight as the weights hanging from the bands will bounce throughout the exercise and have you constantly working to stabilize the bar.
Do 2 sets of 3 reps with this exercise.
The weight should not touch the floor during this exercise. The bands can be doubled over to shorten them if touching the floor at the bottom is a problem. This exercise will pay off in terms of developing a lot of stability and explosiveness from all positions in the squat. Because you use light weights, you can do a few sets of this movement any time you feel the need to work on your stability during the lift.
Assistance Exercises
Kettlebell Goblet Squat: This exercise is great for building powerful stabilizer muscles, a strong core and great balance. In short, this movement gives a lot of payback for the effort. You also get a great stretch in the hips, glutes and lower back.
Begin by standing upright and take a moderately heavy kettlebell or dumbbell in two hands, gripping it by the horns (opposite sides of the handle) if using a kettlebell, or top plates if using a dumbbell. Keeping your chest up, your back flat with a slight arch in the lower back, descend into a deep squat. When you have hit rock bottom get treatment and make, yawn, amends, er, return to the standing position.
You should do 3 sets of 8-10 repetitions with the goblet squat. When you can do 10 reps in all three sets, increase the weight and go back to doing 8 reps.
Hanging Leg Raise, Toes to Bar Style: As noted earlier, a strong core is critical to building a powerful body, and a big time squat. This version of the hanging leg raise is more demanding than the ones used earlier in this course, and will give you super strength as well as a boost in your athleticism.
You should grasp a chinning bar that is high enough so that your feet do not touch the ground. Hang from the bar, and rapidly raise your fully extended legs until you are able to touch the chinup bar with your toes. You will tilt your pelvis toward the diretion of the leg raise, and tighten your abs to bring your legs up. You should touch the chinning bar with your toes, and then drop your legs back to the starting position.
You will find that you fully engage your core, your arms and shoulders during this movement. It is difficult, and you may not be able to touch the bar with your toes more than a few times during the set. Keep pulling your toes as high as you can. Over time you WILL get stronger, and this movement will become routine for you.
Begin by doing 3 sets of 5 to 8 reps. You should work up to doing 8-rep sets as soon as you can. When you are able to do 3 sets of 8 reps, switch to 2 sets of 12-15.
CYCLE FOUR: BOX SQUATS AND FRONT SQUATS
Now that you have finished a third peaking cycle, and have a new one rep max squat in the books, you should give your body a break and work with lighter weights for a while. You will also notice that doing heavy squats has increased your other lifts, as your overall body strength is going up.
In this phase of your training you will builid power in those parts of the squat that are typically most difficult for all lifters: the bottom of the squat, and the "sticking point."
By giving your body some variation from regular squats, you will be able to keep fresh and enthusiastic while building your overall strength. Box squats are one of the best movements for building power while giving you a nice change.
Box Squats: Box squats are an exercise where you put the bar on your back like a regular squat and actually sit down to a sturdy box. Do this exercise in the rack. You will be taking the weight off the rack and backing into a squatting position over the box. When you first try this movement, experiment with a very lightweightbaby so that you get the feel for where you place the box so that you are confident.
Set the safety catchers about 6 inches below where the bar will be at its lowest point in your box squat. If you can't get up with the weight, you can simply bend forward at the waist and set it on the catchers.
When the boxes and catchers are properly positioned, you are ready to begin doing the exercise.
Box squats are done at different heights. You will have to adjust the height of the boxes as you do different sets of box squats.
Group 1 - Box Squat BELOW parallel.
Group 2 - Box Squat ABOVE parallel.
Your first sets of box squats will be done below parallel. Select a box or platform that will allow you to sit down with the bar on your back and is at least 2 inches below parallel. When the box is in position, take a practice rep without any weight on the bar to be certain that the boxes are set in the right place, and you don't have any problem sitting down on them. Now you are ready to begin.
Take a deep breath and hold it until you have squatted and come back to the starting position.
This is the technique for doing the box squat. Take the weight off the rack, and descend until your glutes contact the box. At that point you will sit down as if your were in a chair. You will relax your legs (somewhat) and sit upright. You then lean forward slightly and go back up to the starting position.
Keep your chest up, back flat, and abs tight while sitting on the box. Do not allow your back to round or 'roll over" at any point in this lift. To come back to the standing position, bend forward slightly at the waist, and come up with your chest coming up first. There will be a temptation to start coming up by throwing your rear end upward. DON'T DO THAT! Keep the same strict form that you would use coming out of the bottom of a regular squat and this exercise will really help you build big power.
You will be doing box squats at two different heights: one below parallel, and one just above parallel. You will do 5 sets of box squats at each height. Here is how you will select the weights to use:
Box Below Parallel -
Set 1 - Light weight - 5 reps
Sets 2 through 5 - Increase the weight to 70% of max - 2 reps
Box Above Parallel:
Set 1 - Relatively easy set - 5 reps
Set 2 - Increase to about 70% effort - 3 reps
Set 3 - Increase to about 80% effort - 1 rep
Set 4 - Decrease to about 70% effort - 3 reps.
Selecting weights that will work for you will require experimenting. Because the exercise may be new to many of you, it is important that you don't make the mistake of starting with weights too heavy for you. This leads to a quick halting of progress. You should experiment with weights to see what works best for you. Always remember -- your goal is to make progress over time, not exhaust yourself in one workout. Putting out all you have should only be done at those times when you are focusing on setting personal bests.
The Front Squat
The second exercise in this cycle is the front squat. This is one of the movements that Olympic weightlifters train all the time, and is very much ignored by everyone else. It is a great exercise for building a really powerful core. As such, it is one of the best ab exercises ever devised.
If you have not done this movement before, you should study it to see how the bar is supported across the front of the shoulders (rack). You should be resting the bar on what feels like a "shelf" across the collarbones and frontal deltoids. YOU SHOULD NOT BE SUPPORTING THE BAR WITH YOUR HANDS OR WRISTS.
Gripping and supporting the bar across the shoulders is one of the things that seems to cause people the most problems in learning to do the front squat. The best way to get used to practicing this movement is to begin working with an empty bar and gradually add weight until you have mastered the proper technique.
When you take the bar across the front of your shoulders, you should begin with a grip that is slightly wider than your shoulders. Move forward under the bar, raise your elbows, and extend your shoulders forward. By moving your shoulders forward, you create the "shelf" on which the bar will rest.
Keep your elbows up, roughly parallel to the floor. Many of you will have to allow the bar to rest across the front of your shoulders, with only your fingertips in contact with the bar.
Some of you will be able to keep a regular grip on the bar. This requires a lot of flexibility in the hands and wrists. I do it this way because I learned how to do it at age 14 and have been doing it this way for the last 60 years. Either grip works.
Learning proper front squat technique will enable you to develop some serioius upper body strength. You will also get a really nice look around the waist, as this lift builds a trim and very powerful midsection.
You begin this lift by taking the bar off the rack and standing upright. The bar rests across the upper chest/front delt area, the elbows are elevated and parallel to the floor, the back is flat, and the feet are set slightly wider than shoulder width apart. You are now ready to descend.
Take a deep breath and hold it until you have come all the way back to the starting position.
The first move is to push the buttocks back as if you were going to sit down. You don't want to bend your knees forward. Descend into a low squat position, and keep your head slightly up. You should select a spot on the wall across from you, and focus your eyes on it.
Keeping your head slightly up and your upper arms parallel to the floor will keep your back straight and prevent rounding.
When you have reached the lowest point in your front squat, well below parallel, you should power up out of the bottom and return to the starting position.
You will do 4 sets. As in the box squat, you will have to experiment to see what weights you can effectively use as you learn this lift.
Set 1 - Lightest weight - 5 reps
Set 2 - Select a weight that you could do 5 reps with - 3 reps
Set 3 - Same weight - 3 reps
Set 4 - Weight used on Set 1 - 3 reps
The purpose of doing an initial front squat routine is twofold; first learning how to do it properly, and secondly getting the full benefit of this demanding movement. If this is a new lift for you, or you have not practiced it extensively, take the time to learn how to do it well. This is one training movement that will pay huge dividends in both strength and appearance. If you have been doing front squats before, you can work on perfecting your technique, and be more aggressive when it comes to the weights you use.
Assistance Exercises
Kettlebell Swings -- Alternating Hands: A variation of the kettlebell swing that creates solid conditioning and good coordination is one where you alternate grip hands on each rep. As in the regular kettlebell swing, you swing the bell back between your legs as if you were hiking a football. You then suddenly drive the bell upwards using your hips, glutes and hamstrings. Your arms should not provide any force in driving the bell upward.
In the alternating hand variation, you will drive the bell upward to the point where it becomes stationary, then let go of it with one hand and grab the handle with the other. Then allow the bell to swing back between your legs while gripping it with the other hand. You alternate the hand you use to grip the bell on each swing.
This produces a powerful side-to-side stress on your core. You will find that the alternating hand form of the swing requires a lot of coordination and focus.
You should not allow the bell to drift out too far in front of you, as that will make the hand exchange more and more difficult as you swing the bell. Keep the arc of the bell relatively close to your body so that you don't have to "reach" for the bell each time you change hands. The ideal arc would be one where the "catching" arm is slightly bent.
Remember that you should get the power from this movement from snapping your hips forward, and driving the bell up with this power. You should feel the effort coming from your abs, glutes and hamstrings. If you feel it coming from your lower back, you are doing the movement wrong.
CYCLE FIVE: PEAKING CYCLE
Powerlifting competitors use a wide variety of peaking programs to increase their maximum lifts. This is a peaking program you can do for 8 weeks. The basic idea is that you will concentrate your effort into sets where you begin the cycle doing 3 reps, then go to 2 and ultimately to 1 rep.
You will do two assistance exercises that will build explosiveness into your squatting.
Exercise #1 - Full Squat - Peaking Cycle
The first six weeks of the cycle, you will be doing 4 sets of squats each training session. The big difference from previous routines is that you will alternate one heavy and one light workout each week. That way you will essentially do ONE HEAVY TRAINING SESSION EACH WEEK. The second session will be to help you build explosiveness and muscular endurance.
The squat routine looks like this:
Weeks 1 - 3
Heavy Day - Squat
Set 1: 70% of One Rep Max - 3 reps
Set 2: 80% of One Rep Max - 3 reps
Set 3: 85% of One Rep Max - 3 reps
Set 4: 80% of One Rep Max - 3 reps
Assistance Lifts:
Dumbbell of Kettlebell Lunge - 2 sets of 10
Dimmel (partial) Deadlift - 2 x 15
Weeks 4-6
Heavy Day - Squat
75% x 2 reps
85% x 2
95% x 1
85% x 1
Assistance Work:
Same as weeks 1-3.
Week 7
Heavy Day - Squat
Up to . . .
95% x 1
102% x 1
No assistance work in week 7 of the peaking cycle.
Week 8
Contest of Personal Best Attempt.
After warming up do single reps with:
85%
103%
107% or your best estimate of what you can do.
You should do all full squats with perfect technique. This will ensure that you get the maximum training effect from the program. Once your technique begins to erode, you limit the chances you have for doing really heavy squats.
Assistance Exercises
Dumbbell or Kettlebell Lunge: The lunge is one of the great exercises for building strength and power in the legs, hips, core and back. It is also an exercise that is almost always done with horrible technique, and is thus of little or no value. You, or course, will do it correctly and get monster strong.
If you have been frequenting "regular gyms" you probably see people doing "result free" lunges. These are worse than useless, and are likely to get you hurt. Doing these will ensure that you never get any real benefit from the exercise.
Before showing you how to do the lunge correctly, I want to point out some of the major problems with the results-free version. First of all, there is no depth to the lunge, so there is no training benefit to the hips, core or upper leg. Bent forward, there is extra stress on the lower back and neck. Finally, the shoulders are rounded so that the neck and upper back are in poor alignment. The foot spacing is so narrow that there is no challenge that requires developing better balance or coordination. If a person takes tiny steps and does not go deep into the lunge, they can boast about lifting much bigger weights than they could do if they did the exercise correctly. This is of course a complete illusion.
There are more problems with this kind of lunge, but by now you can see that this is not the type of lunge you want to be doing. Doing the lunge correctly willi yield a ton of benefits in strength and athleticism.
Let's start by ensuring your trunk is upright. You never want to bend forward AT ANY TIME when doing lunges. The second issue is the length of the stride; thus how deep you go in the bottom portion of the lift.
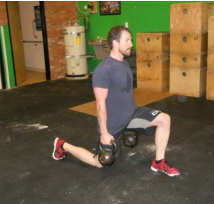
You should begin in a standing position with a kettlebell or dumbbell in each hand. Take a step forward witgh your right leg so that you descend into a position where the top of your right thigh is parallel to the floor. Your trunk should be absolutely vertical, and the weights should hang down at your sides directly alongside your hips.
When you step forward, you immediately confront the issue of maintaining balance when you go into the deep position (also called the "split"). If you lead with your right leg, then yhour step forward should be slightly to the right rather than straight ahead. This will allow you to keep your balance while holding weights in the split position. You should experiment with the foot position that works best for you by doing the lunge without weights.
You should come out of the split by straightening your front (right) leg. You then bring the front (right) leg back to the rear (left) leg. When you do this, you will be standing on exactly the same spot where you were when you began the exercise.
Some versions of the lunge have you bringing the jback leg up to the front leg. This means that you "walk" around the exercise area. You can do this if you want, but the stationary version of the exercise creates fewer requirements for training space. There is no particular benefit for doing the "walking" version of the lunge.
Do 2 sets of 10 reps. Each step is a rep. That means you will be doing 5 reps with each leg on each set.
Begin with a weight that is relatively easy to manage. It is FAR MORE important that you master the proper technique for lunging than it is that you create an illusion that you can handle artificially high weights. Increase the weights when you can do so and keep perfect form.
The Dimmel Deadlift
Some of the assistance exercises in this program may be new to you. Each of them builds a major component of yur overall body power. The first is named for a legendary master of the squat, the late Matt Dimmel. He invented this exercise back at the Westside Barbell Club in Columbus, Ohio back in the 1980's. This is a partial deadlift, but done in a very specific way in order to really build up the posterior power chain: your glutes, hamstrings, hips and lower back.
Like all other power exercises, the technique on this movement is very important. You begin by loading a very light weight on the barbell. For example, the Columbus studs who squatted over 900 pounds would load the bar to 225. if you are a 400-pound squatter, you should load the bar to about 135. There is NO real advantage to be gained by using unusually heavy weight in this exercise. The purpose is to build speed and explosiveness.
As the weight is light, you will use a grip where both palms are turned inward toward the body. Set your feet at the spacing you use for a squat. Grab the bar so your arms hang straight down . . . no wide grips, no narrow grips. Stand up with the bar hanging at arms' length. You are ready to begin the exercise.
You lower the bar to the midpoint of your shins. DO NOT lower the bar all the way to the floor. When you reach the midpoint of the shins, stand erect very rapidly. You should impel the bar upward by driving your hips forward and straightening your legs at the same time. Your arms do not contribute anything to moving the bar. They are merely "ropes" you use to hang on to the bar.
When you reach the top, immediately drop the bar quickly bar back to the midpoint of the shin, and then explosively stand erect. You will repeat this 20 times!
The key to success in this exercise is to be fast and explosive. There is little benefit to doing this exercise slowly.
Recovery Prior to Attempting Your Personal Best
In the last two weeks of this cycle, you will stop doing all assistance exercises. You are saving up for the maximum effort you will put out in Week 8 . . . a personal best for one rep.
You should always be aware of the propensity for lots of lifters to over-train and burn up needed energy in the gym, rather than getting a superior single lift. If you are a real "gym rat" you will probably know lots of lifters who failed to reach a goal because they didn't pay attention to recovering and doing what is really needed to lift big weights.
Perhaps the most common reason to miss making a personal best attempt is that the lifter has done way too much work in the last weeks before attempting a maximum lift.
The biggest single thing that will help you get a new personal best, or max lift is GETTING THE PROPER REST AND RECOVERY IN THE WEEK OR TEN DAYS BEFORE ATTEMPTING THE RECORD LIFT.
Let me tell you what some of the greatest strength coaches of all time have said about this . . .
I'll paraphrase the great Louie Simmons who said, "There is NOTHING you can do to get stronger in the week before a max lift attempt, but there certainly is a lot you can do to get weaker."
The great Dan John said, "Lifting heavy weights will not make you strong. Lifting heavy weights AND recovering will make you very strong."
Rest and Recovery are absolutely essential if you are going to become the best you can possibly be.
Enjoy Your Lifting!
No comments:
Post a Comment