Part One is Here:
A REVIEW
At this point, we have the information necessary to begin structuring an effective forearm program. Let's review before getting down to the specifics of exercises.
1) We will be working to increase strength, mass, and definition of the major muscle groups in your forearms, wrist flexors/extensors, forearm supinators/pronators, finger flexors/extensors, plus the brachioradialis. Remember, developing balanced strength around the wrist joint greatly reduces your chances of wrist injury during other athletic pursuits.
2) Our program will incorporate the Fatigue/Tension principle. This means:
- Short rests between exercises for the same muscle group, or no rest between exercises for different muscle groups.
- Use of relatively light weights. General guideline - in a 6 to 8 rep set, the last 2 reps should be nearly impossible. We is woikin' hard at this game.
- Adjusting exercises to match resistance to muscle leverage.
3) We will let the Interdependency of Muscle Groups dictate exercise order. The result:
- wrist extensor exercises will precede brachioradialis exercises.
- finger flexor exercises will come last.
4) We will only use exercises that put minimal stress on the elbow and wrist joints.
PROGRAM SECTION
Now, down to specifics. You may already be familiar with some of the following exercises, but keep two things in mind:
1) The description contains certain fine points of form you are probably familiar with. These fine points can elevate an exercise from "workable" to "incredible!" Give them a chance.
2) Remember synergism: We optimize on all levels. First, applying the laws of biomechanics we make each exercise as effective as possible. Then, we work to discover the optimum order. In the final analysis, it's not so much the exercises themselves as their sequence and timing that makes Power Forearms! such an effective conditioning tool.
The Exercises
Wrist Twists with Pipes
directly: pronators/supinators
indirectly: extensors/flexors
This exercise warms up your forearms and wrists. Needed: two dumbbell bars (dumbbells with no plates on either end), or small heavy pipes 12-15" long.
Grasp the DB bars in the center, one in each hand. Extend your arms out to your sides. Your hands should be about 18" from your body. Gripping the bars AS TIGHTLY AS POSSIBLE, twist bars back and forth at a rate of about 1 back/forth twist per second. Continue for 45 seconds to a minute.
Next, bend arms at elbows so forearms are parallel to the ground, and, once again, twist bars for 45 seconds to a minute.

Wrist Curls
wrist flexors with forearms supinated
Grip a barbell, palms up, with your hands about six inches apart. Straddle an exercise bench, and let about half of your forearms extend over the end. Brace your arms against the inside of your knees. Let your wrists bend back and slightly open your fingers, then curl the weight up as far as you can go. Repeat.
Let the elbows rise up off the bench at the bottom of the motion. Doing so will more closely match the resistance of the exercise to the firearm, er, forearm flexors. Result: you will be able to use more weight - and massive forearms only come from a hefty overload!
You can increase the effectiveness of the exercise by gripping the bar tightly throughout the motion. But DO NOT open your hands or roll the bar to the tips of your fingers, as this may burn out the finger flexors and limit the effectiveness of your workout.
Note: Check out the hips higher than elbows position. Also, if you're familiar with the one DB version Dave Draper and Chuck Sipes used, and I'm sure many others did prior to them, note the position of the elbows in relation to the shoulders; the narrowness of the grip, the angle of the forearms to upper arms while curling.

Reverse Wrist Curls
directly: wrist extensors
indirectly: brachioradialis
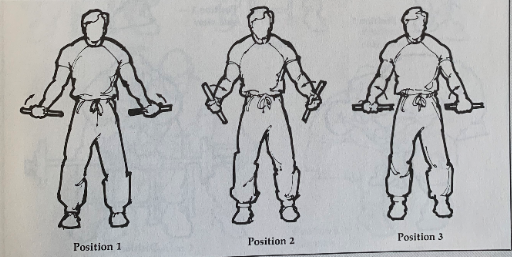
Take a slightly wider than shoulder width grip on a barbell, palms down, and place your forearms on your knees as you sit on an exercise bench. Your wrists should be just beyond your knees; your forearms should be at a slight diagonal so your elbows are just outside or your thighs. In the starting position, your elbows should be up off your lets, your wrists bend down (see Position One, side view).
We cannot stress enough the importance of keeping an extremely tight grip on the bar. We are not talking about your standard clench. Hang on to that bar as if you were trying to squeeze it into dust!

Behind the Back Wrist Curls
a.k.a. Bloatlord Bend Over and Bend Bar Wrist Curls
wrist flexors with forearms pronated
Put a barbell on a bench two or three inches from the end of the bench. Straddle the bench, palms facing back. Bend forward and down, and pick up the bar with hands shoulder width apart.
Partially straighten up. This should leave you with your forearms against the outsides of your thighs and the bar hanging in space behind you. Narrow your grip slightly by sliding your hands toward one another.
Gripping the bar tightly (TIGHTLY!), curl it up as far as you can. Hold for one second, then lower the bar. Repeat.
Note:
- If you don't really feel a burn, or if the position is uncomfortable, try using a still narrower grip.
- It's okay to use A BIT of body motion to help you lift the weight.

Reverse Curls
brachioradialis
Stand with your knees slightly bent, holding a barbell with hands palms-down, about shoulder width apart. Without heaving your shoulders, whipping your arms, or snapping the muscles taught lift the weight until it touches your upper chest. Your elbows should come slightly forward as you lift, but they should NOT move out sideways! Then lower the bar. Repeat. (Remember to think your forearms into working -- concentrate, feel the muscle contracting.
The next three exercises make use of the Single Ended Dumbbell (S.E.D.). Make one by taking the weights off one end of a regular dumbbell.

S.E.D. Wrist Abduction
wrist abductors
Stand erect, holding the dumbbell as close to the unweighted end as possible. The weight should be in front of you. Keeping your grip tight, lower the bar until it is pointing downwards. Your elbow, thumb, and the weights on the dumbbell should fall in a straight line. Bending only at the wrist, curl the bar up as high as it will go. Lower. Repeat for the desired number of sets and reps.

S.E.D. Wrist Adduction
wrist adductors
Same setup as above, but the weight should be behind you. Keeping your grip tight, lower the bar until it is pointing downwards. Your elbow, thumb, and the weights on the dumbbell should still fall in a straight line. Bending only at the wrist, curl the bar up as high as it will go. Lower. Repeat for the desired number of sets and reps.

S.E.D. Wrist Twists
forearm pronators/supinators
Same setup as above, but seated. Brace your forearm on a workout bench (not your knee, that position is too unstable). Keep your wrist locked so the bar forms a 90 degree angle to your arm. Rotate your forearm, lowering the weight TO THE SIDE as far as it will go -- first to the inside (to the left if your holding the S.E.D. in your right hand) and then to the outside. Repeat.
You should feel an intense stretch along the edge of the bone on the thumb side of your forearm. Be careful to control the weight throughout the motion. Letting it flop from one side to the other can result in strained wrist tendons.
Grip Work
finger flexors
Assume the same position you used for Wrist Curls. Instead of keeping a tight grip and curling at the wrists, loosen your grip, allow the bar to roll to the tips of your fingers, and then curl it back up at the fingers. See Wrist Curl illustration for starting position.

Finger Extension
finger extensors
Cup your left hand over the back of your right hand, with both palms pointing toward you. You should have contact along the entire length of your fingers. Providing MODERATE RESISTANCE with the palm of your left hand, completely straighten the fingers of your right hand. (This is not an isometric exercise). Repeat for the desired number of reps. Switch hands and follow the same procedure.
Part Three Continues from Here . . .
Enjoy Your Lifting!
No comments:
Post a Comment